1. Choose the Best Software for the Job
Before you start designing your packaging, you need to carefully consider which program is best for tackling the job. Most packaging designers will send their 2D artwork to the manufacturer in a vector format. Vector files are scalable, and it’s easy to create dieline templates using the line and shape tools in vector programs like Adobe Illustrator or Inkscape.
2. Create a Dieline
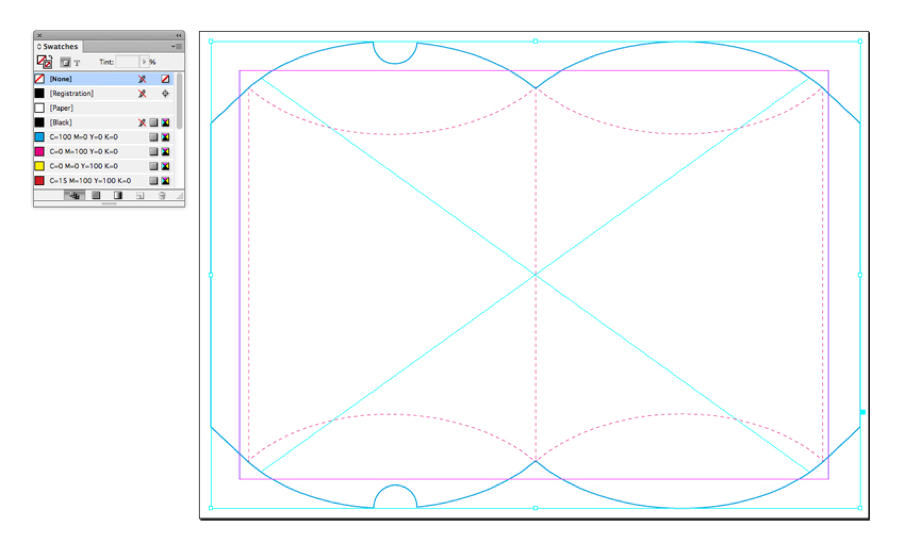
A dieline is the flat template for the package. This is usually put together by the packaging designer in a vector program, like Illustrator, using simple lines and shapes.

The dieline should indicate where the packaging template should be cut and where it should be perforated (an impression is made by a machine, ready for folding). As these are two separate pieces of information for the printer, the cutting (trim) lines and perforation (fold) lines should be placed on separate layers and as spot colors, which means the cutting and trimming will be performed at different stages.
It’s also advisable to rename the dieline layers in your Illustrator document to ‘DO NOT PRINT’, which is a clear note to the manufacturer that these layers are intended for post-print processing.
3. A Box Isn’t Simply a Box
Thought a box was just a box? Think again! Take a look around your house or office and find some examples of packaging—you’ll notice that almost all of them will be some kind of box, but they may vary in size, depth, and shape, and they might have flaps which are integrated with the design, or even a separate lid.
Although boxes may appear in many forms, for technical purposes all you need to know is that boxes come in two production formats: setup boxes and folding cartons. Setup boxes are more expensive to produce and are used for high-end products, like retail packaging, special confectionery, and gift boxes. They are often made up of two parts, a top and bottom tray, which are printed onto rigid card. Setup boxes are a good choice if you want to produce something particularly special and don’t mind spending more to manufacture it.
Folding cartons are used for a huge range of products, from food products to household goods. The cereal box is one of the classic examples of a folding carton format. Folding cartons often consist of just a single template, which is created as a fold-out 2D design, before being sent to the packaging manufacturer to be printed onto card, and then laminated, folded, cut and glued.
You should choose a box format which suits both the product and the retail price point. There’s no point packaging biscuits in an expensive setup box if the retail price is relatively low, but you might want to opt for a setup box if you’re packaging something more expensive and aspirational, like jewellery or shoes.
4. Home Truth No. 2: There Are Tons of Box Closure Types
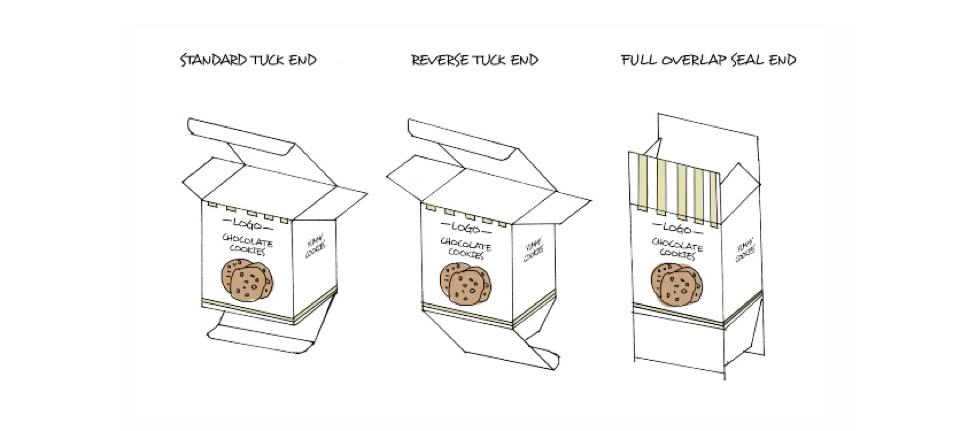
Yup, just when you’d got your head around box formats, you discover that there are also loads of different ways that you can close the box. Much like sailors’ knots, there are seemingly dozens of closure types. Many of these are designed to function as a sturdy seal for your box, as well as being easy to open when required. Some of the more common types of closure are:
- Standard Tuck End
- Reverse Tuck End
- Full Overlap Seal End

There are also some specific styles of box which have industry-standard formats and closure types. Just a few of the most commonly used are:
- Pillow box: a simple curved box shape, with curved closures to match, which usually packages candy or cosmetics.
- Display box: for displaying point-of-purchase items on counters and shelves.
- Edge-locked sleeve: this is the card covering over ready meal and other food items.
- Book style box: with a book-like shape and a hinged lid, this is often used to package custom software, medical or cosmetic items, often as limited-edition or sample products.
5. Create a Mockup
This involves printing a physical copy of your template and assembling it. This mockup can be as basic as you like—simply print it out onto standard printer paper and don’t worry too much about the quality of the print. This exercise is purely to allow you to assess how the product folds and stays together, and you can also judge which parts of the design will be most visible to the consumer when it sits on the shelf. This is also an essential process for judging the size of type on your design. It’s amazing how text can look way too small when printed in hard copy.
Tweak your digital design if you need to, and print out and assemble a final mockup. Once you’re happy with the result, you can take this along to the printers as a tool for explaining exactly how you would like the package to be assembled.
6. Understand Your Print Finish Options
You’ve created your dieline, added design elements and symbols to your template, and produced a mockup—now you’re ready to move on to the printing stage.
Consider the different print finishes that might be suitable for your design. These finishes are applied after the template is printed and can add an extra textural and visual dimension to your package. Some of the most popular finishes for packaging designs are below:
- Spot Varnish—creates a high-gloss effect on part of your design, such as a logo or brand name.
- Die Cutting—cuts out part of the package to create a window effect.
- Lamination—adds extra coatings to the package’s surface to add gloss or provide protective qualities.
- Hot or Cold Stamping—adds a metallic or special colored effect to part of the package.
- Embossing or Debossing—creates a raised or depressed area on the packaging to add texture and a 3D quality to flat graphics.
7. Prepare for Printing
Once you’ve discussed your printing requirements and come up with some stock choices and print finish options, you are ready to request a quote for the job. The expense will vary depending on the print materials, the time to trim and fold each package, the number and type of print finishes to be added afterwards, and the size of the print run. Larger print runs are normally better value than small runs, so it’s a wise idea to get a quote for several different quantities—you may well find that you can produce twice as many packages for very little extra money.
We will require your file in a press-ready PDF format, and it may be a good idea to provide the native files too (the original artwork files, prepared in, for example, Illustrator). This means we can re-export your artwork if the PDF file hasn’t been set up quite right.
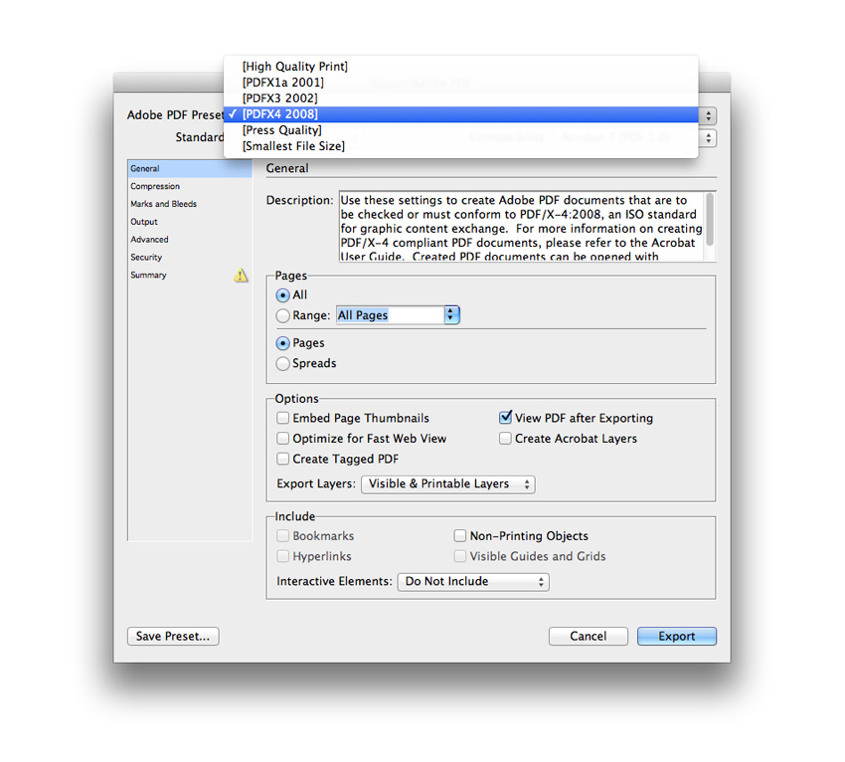
Make sure your exported artwork uses high-quality 300 DPI images, and make sure to convert any RGB graphics, text or color to a CMYK colorspace. When exporting your artwork, choose the PDF/X-4 preset from the menu of PDF options. This preset preserves the layers in your artwork, allowing us to set up different print runs easily, for CMYK, spot colors and print finish layers.

Need help with your Package design? Get in touch with a Hotspot Printing & Packaging Specialist today!
